Explanations
Explanation is discussion that clarifies and illuminates a particular topic. Explanation is understanding-oriented.
Data Layer Concepts
The relations between all major Data Layer concepts of the SDK are the following: a Project consists of multiple Documents. Each one of the Documents consists of the Pages and belongs to a certain Category. Text in a Document can be marked by Annotations, which can be multi-line, and where each continuous piece of text contained into an Annotation is a Span. Each Annotation is located within a certain Bbox and is defined by a Label that is a part of one of the Label Sets. An Annotation Set is a list of Annotations that share a Label Set.
For more detailed information on each concept, follow the link on the concept’s name which leads to the automatically generated documentation.
Project
Project is essentially a dataset that contains Documents
belonging to different Categories or not having any Category assigned. To initialize it, call Project(id_=YOUR_PROJECT_ID).
The Project can also be accessed via the Smartview, with URL typically looking like https://YOUR_HOST/admin/server/document/?project=YOUR_PROJECT_ID.
If you have made some local changes to the Project and want to return to the initial version available at the server, or
if you want to fetch the updates from the server, use the argument update=True.
Here are the some of properties and methods of the Project you might need when working with the SDK:
project.documents– training Documents within the Project;project.test_documents– test Documents within the Project;project.get_category_by_id(YOUR_CATEGORY_ID).documents()– Documents filtered by a Category of your choice;project.get_document_by_id(YOUR_DOCUMENT_ID)– access a particular Document from the Project if you know its ID.
Document
Document is one of the files that constitute a Project. It consists of Pages and can belong to a certain Category.
A Document can be accessed by project.get_document_by_id(YOUR_DOCUMENT_ID) when its ID is known to you; otherwise, it
is possible to iterate through the output of project.documents (or test_documents/_documents) to see which
Documents are available and what IDs they have.
The Documents can also be accessed via the Smartview, with URL typically looking like https://YOUR_HOST/projects/PROJECT_ID/docs/DOCUMENT_ID/bbox-annotations/.
Here are some of the properties and methods of the Document you might need when working with the SDK:
document.id_– get an ID of the Document;document.status– get the status of the Document in the pipeline. The status can be one of the following:Queuing for OCR: 0
Queuing for extraction: 1
Done: 2
Could not be processed: 111
OCR in progress: 10
Extraction in progress: 20
Queuing for categorization: 3
Categorization in progress: 30
Queuing for splitting: 4
Splitting in progress: 40
Waiting for splitting confirmation: 41
document.dataset_status– get the dataset status of the Document. The dataset status can be one of the following:None: 0
Preparation: 1
Training: 2
Test: 3
Excluded: 4
document.text– get a full text of the Document;document.pages()– a list of Pages in the Document;document.update()– download a newer version of the Document from the Server in case you have made some changes in the Smartview;document.category()– get a Category the Document belongs to;document.get_images()– download PNG images of the Pages in the Document; can be used if you wish to use the visual data for training your own models, for example;
Category
Category is a group of Documents united by common feature or type, i.e. invoice or receipt.
To see all Categories in the Project, you can use project.categories.
To find a Category the Document belongs to, you can use document.category.
To get documents or test_documents under the Category, use category.documents() or category.test_documents() respectively.
You can also observe all Categories available in the Project via the Smartview: they are listed on the Project’s page in the menu on the right.
Page
Page is a constituent part of the Document. Here are some of the properties and methods of the Page you might need when working with the SDK:
page.text– get text of the Page;page.spans()– get a list of Spans on the Page;page.number– get Page’s number, starting from 1.
Category Annotation
Category Annotation defines a Category of a Page or a Document. There can be more than one Category Annotation per Document and per Page; Category Annotations typically come with different confidence levels.
To get a Category Annotation of a particular Category for the Page, use Page.get_category_annotation(category).
To get a maximum-confidence Category Annotation for a Page, use Page.maximum_confidence_category_annotation.
To see a maximum-confidence Category Annotation for a Document, use Document.maximum_confidence_category_annotation.
Span
Span is a part of the Document’s text without the line breaks. Each Span has start_offset and end_offset denoting its starting and finishing characters in document.text.
To access Span’s text, you can call span.offset_string. We are going to use it later when collecting the Spans from the Documents.
Annotation
Annotation is a combination of Spans that has a certain Label (i.e. Issue_Date, Auszahlungsbetrag) assigned to it. They typically denote a certain type of entity that is found in the text. Annotations can be predicted by AI or be human-added.
Annotations always have to belong to an Annotation Set with a Label Set compatible with the Annotation’s Label.
Like Spans, Annotations also have start_offset and end_offset denoting the starting and the ending characters. To
access the text under the Annotation, call annotation.offset_string.
To see the Annotation in the Smartview, you can call annotation.get_link() and open the returned URL.
Annotation can be created in two ways: using Spans and using Bboxes.
To create an Annotation using Spans, generate all Spans you want to include into the Annotation using Span class and
supply a list of Spans into spans argument of Annotation class.
To create an Annotation using Bboxes, generate all Bboxes you want to include into the Annotation using Bbox class.
Note: make sure that all Bboxes you create actually contain OCR-recognized text inside them; otherwise, an Annotation
will not be created and an error will be raised. After creating the Bboxes, supply a list of them into bboxes keyword
argument of Annotation class.
Annotation Set
Annotation Set is a group of Annotations united by Labels belonging to the same Label Set.
To retrieve all that Annotation Sets of a Document call document.annotation_sets(). To see Annotations in the set,
call annotation_set.annotations().
Every Document has one unique default Annotation Set, which can be retrieved with document.default_annotation_set. This
Annotation Set’s Label Set is the Document’s Category default Label Set and has the same name and ID as the Category. It
can be used to store all Annotations that don’t need to be organized into a separate Annotation Set.
To check what Annotation Labels can be added to an Annotation Set, you can check with annotation_set.label_set.labels.
Documents also have a unique Annotation Set for NO LABEL Annotations, which can be retrieved with document.no_label_annotation_set.
Label
Label defines what the Annotation is about (i.e. Issue_Date,
Auszahlungsbetrag). Labels are grouped into Label Sets. To see Annotations with a current Label,
call label.annotations() .
Label Set
Label Set is a group of related Labels. A Label Set can belong to different Categories and be used to create one or more Annotation Sets, depending on the Label Set.
Every Category has a default Label Set, which can be retrieved with category.default_label_set. This Label Set is used
to create the default Annotation Set for each Document in the Category.
Label Sets have an attribute, label_set.has_multiple_annotation_sets, which determines whether more than one Annotation Set
can be created per Document. If has_multiple_annotation_sets is False, then only a single Annotation Set with the
Label Set can be created per Document.
Bbox
Bbox is used to represent an area of a Page, defined by the coordinates of the bottom left corner and the top right corner of the bounding box. Check out our coordinate system explainer for more details.
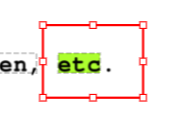
You can access all character Bboxes of the Document by using document.bboxes. A Bbox can also be associated with a single Span, or with all Spans within an Annotation. To obtain the Bbox associate with a single Span, call span.bbox(). To obtain the Bbox wrapping all Spans in an Annotation, call annotation.bbox(). This should not be
confused with Annotation.selection_bbox, which is an attribute storing the Bbox a user has selected in the Smartview when creating the Annotation.
The following image shows a bounding box with red border, which is retrieved with Annotation.selection_bbox , and a bounding box highlighted in green, which is retrieved with Annotation.bbox():
AI Concepts
Document processing pipeline of Konfuzio consists of several steps that require usage of different AIs. In this section, we will explain what are these AIs and what concepts they utilize.
Categorization
Each new Document gets assigned a Category when uploaded to Konfuzio. If you use a Categorization AI to automatically assign a Category to a Document (such as the NameBasedCategorizationAI, each Page will be assigned a Category Annotation with predicted confidence information, and the following properties will be accessible. You can also find these documented under API Reference - Document, API Reference - Page and API Reference - Category Annotation.
Property |
Description |
|---|---|
|
The AI predicted Category of this Category |
|
The AI predicted confidence of this Category |
|
List of predicted Category Annotations at the |
|
Get the maximum confidence predicted Category |
|
Get the maximum confidence predicted Category |
|
Returns a Category only if all Pages have same |
|
List of predicted Category Annotations at the |
|
Get the maximum confidence predicted Category |
|
Get the maximum confidence predicted Category |
Categorization AI Overview Diagram
In the first diagram, we show the class hierarchy of the available Categorization Models within the SDK. Note that the Multimodal Model simply consists of a Multi Layer Perceptron to concatenate the feature outputs of a Text Model and an Image Model, such that the predictions from both Models can be unified in a unique Category prediction.
In the second diagram, we show how these models are contained within a Model-based Categorization AI. The Categorization AI class provides the high level interface to categorize Documents, as exemplified in the code examples above. It uses a Page Categorization Model to categorize each Page. The Page Categorization Model is a container for Categorization Models: it wraps the feature output layers of each contained Model with a Dropout Layer and a Fully Connected Layer.
File Splitting
Documents can often come not as separate entities, but rather as a stream of Pages. This leads to a more complex navigation and information retrieval. Document splitting tackles this by disentangling these intertwined files into separate Documents. Konfuzio SDK introduces you to tools and models that automate this process, streamlining your work with multi-Document PDFs.
You can train your own File Splitting AI on the data from any Project of your choice (data preparation tutorial here). Note that Pages in all the Documents used for training and testing have to be ordered correctly – that is to say, not mixed up in order. The ground-truth first Page of each Document should go first in the file, ground-truth second Page goes second and so on. This is needed because the Splitting AI operates on the idea that the splitting points in a stream of Pages are the starting Pages of each Sub-Document in the stream.
For the purpose of processing documents consisting of multiple files, the SDK offers several tools that facilitate splitting them into sub-documents:
A Context Aware File Splitting Model Utilizes a straightforward logic based on scanning documents within a category and identifying strings exclusive to the first pages of each document. An instance of the Context Aware File Splitting Model can be employed to establish an initial file splitting pipeline, which can later be substituted with more intricate and advanced solutions as needed.
A Textual File Splitting Model The Textual File Splitting Model is a key component of the SDK, leveraging state-of-the-art Transformers architecture to efficiently split multi-document files into shorter documents while maintaining high accuracy and minimizing latency. By default, the model uses the popular DistilBERT architecture which is a distilled version of BERT, that offers a compelling blend of accuracy and computational efficiency. By compressing the original BERT model, DistilBERT reduces the number of parameters by 40% while keeping 97% same performance. However, the model used in Textual File Splitting can be customized through a
model_nameclass attribute, allowing users to specify their preferred pre-trained Transformers model during instantiation.A Multimodal File Splitting Model This model incorporates both textual and visual data from documents, making it suitable for various document types and average-sized datasets. However, it may operate at a slower speed compared to the Textual File Splitting Model and is more prune to overfitting.
For developing a custom File Splitting approach, we propose an abstract class AbstractFileSplittingModel.
Information Extraction
Information Extraction is a process of obtaining information from the Document’s unstructured text and labelling it with Labels like Name, Date, Recipient, or any other custom Labels. For example, Labels could be the Name, the Date, the Recipient, or any other field of interest in the Document.
Within Konfuzio, Documents are assigned a Category, which in turn can be associated to one or more Label Set(s) and therefore to a Label. To be precise, it is Label Set(s) that are associated to Categories, and not the other way around.
Konfuzio offers several tools to run Information Extraction:
RFExtractionAI that utilizes a predefined architecture and can be trained on user’s data;
Custom Extraction AI that can use an architecture defined by the user or a pre-existing model;
Information Extraction always happens at a Category level, that is, operates under a single Category.
Architecture SDK to Server
If you hover over the image you can zoom or use the full page mode.
If you want to edit the diagram, please refer to the GitHub Drawio Documentation.
Directory Structure
├── konfuzio-sdk      <- SDK project name
│   │
│   ├── docs                               <- Documentation to use konfuzio_sdk package in a project
│   │
│   ├── konfuzio_sdk                       <- Source code of Konfuzio SDK
│   │  ├── __init__.py                     <- Makes konfuzio_sdk a Python module
│   │  ├── api.py                          <- Functions to interact with the Konfuzio Server
│   │  ├── cli.py                          <- Command Line interface to the konfuzio_sdk package
│   │  ├── data.py                         <- Functions to handle data from the API
│   │  ├── evaluate.py                     <- Functions to evaluate the performance of the AIs
│   │  ├── extras.py                       <- Classes to initialize AI-related dependencies safely
|   |  ├── normalize.py                    <- Functions to normalize Spans according to data_type
│   │  ├── regex.py                        <- Helper Functions to handle regex related tasks
│   │  ├── samples.py                      <- Local sample test Project
│   │  ├── settings_importer.py            <- Meta settings loaded from the project
│   │  ├── urls.py                         <- Endpoints of the Konfuzio host
│   │  ├── utils.py                        <- Utils functions for the konfuzio_sdk package
|   |  |
|   |  ├── bento                           <- Bento module to containerize AIs and serve them in Bento format
|   |  |  ├── extraction                   <- Bento containerization for Extraction AI
|   |  |     ├── rfextractionai_service.py <- Service to handle request and response to a containerized Extraction AI
|   |  |     ├── schemas.py                <- Schemas of request and response to a containerized Extraction AI
|   |  |     ├── utils.py                  <- Utility functions for pre- and postprocessing of request and response
|   |  |
│   |  ├── trainer                         <- Trainer module to train AI models
|   |  |  ├── __init__.py                  <- Makes trainer a Python module
|   |  |  ├── base.py                      <- Base class for all AIs
|   |  |  ├── document_categorization.py   <- AI for Document categorization
|   |  |  ├── information_extraction.py    <- AI for Information extraction
|   |  |  ├── file_splitting.py            <- AI for File splitting
|   |  |  ├── image.py                     <- Image processing helper functions
|   |  |  ├── tokenization.py              <- Custom tokenization classes
|   |  |
│   |  ├── tokenizer                       <- Tokenizer module to tokenize documents
|   |  |  ├── __init__.py                  <- Makes tokenizer a Python module
|   |  |  ├── base.py                      <- Base class for all Tokenizers
|   |  |  ├── paragraph_and_sentence.py    <- Paragraph and Sentence Tokenizer
|   |  |  ├── regex.py                     <- Various Regex Tokenizers
|   |
│   ├── tests                              <- Pytests: basic tests to test scripts based on a demo project
│   │
│   ├── konfuzio_sdk_extras_list.py        <- List of extra dependencies for different modes of installation of the SDK
│   ├── .gitignore                         <- Specify files untracked and ignored by git
│   ├── README.md                          <- Readme to get to know konfuzio_sdk package
│   ├── pytest.ini                         <- Configurations for pytests
│   ├── settings.py                        <- Settings of SDK project
│   ├── setup.cfg                          <- Setup configurations
│   ├── setup.py                           <- Installation requirements
Containerization of AIs
Note: This section requires familiarity with the concepts of containerization and REST API.
To ensure safety, flexibility, retrocompatibility and independency, we store and run AIs using Bento ML containerization framework.
When a model is saved, it uses the latest schema version from bento.ai_type.schemas.py which specifies how the service
communicates with the Server. After that, a model becomes part of a Bento archive.
Inside the Bento archive, there are a lockfile with dependencies, the Python runtime version, the pickled model itself, a Dockerfile and a Python file that serves a REST API for the model. It also specifies the schema version for this model.

To save a model as a Bento instance, use save_bento() method of an AI class that you want to save, for instance:
from konfuzio_sdk.trainer.information_extraction import RFExtractionAI

model = RFExtractionAI()
model.save_bento()
Running this command will result in a Bento creation in your local Bento storage. If you wish to specify an output for a Bento archive, you can do this via the following command:
model.save_bento(output_dir='path/to/your/bento/archive.bento')
The resulting Bento archive can be uploaded as a custom AI to the Server or an on-prem installation of Konfuzio.
If you want to test that your Bento instance of a model runs, you can serve it locally using the next command:
bentoml serve name:version # for example, extraction_11:2qytjiwhoc7flhbp
After that, you can check the Swagger for the Bento on 0.0.0.0:3000 and send requests to the available endpoint(s).
To run a Bento instance as a container and test it, use a following command:
bentoml containerize name:version # for example, extraction_11:2qytjiwhoc7flhbp
Document processing with a containerized AI
This section describes what steps every Document goes through when processed by a containerized AI. This can be helpful if you want to create your own containerized AI - the sample conversion steps can be used as blueprint for your own pipeline.
The first step is always the same: transforming a Document into a JSON that adheres to a predefined Pydantic schema. This is needed to send the data to the container with the AI because it’s not possible to send a Document object directly.
AI type |
Processing step |
Conversion function |
Input |
Output |
|---|---|---|---|---|
Categorization |
Convert a Document object into a JSON request |
|
Document |
JSON structured as the latest request schema |
Categorization |
Recreate a Document object inside the container |
|
JSON |
Document |
Categorization |
Convert page-level category information into a JSON to return from a container |
|
Categorized pages |
JSON structured as the latest response schema |
Categorization |
Update page-level category data in an original Document |
|
JSON |
Updated Document |
File Splitting |
Convert a Document object into a JSON request |
|
Document |
JSON structured as the latest request schema |
File Splitting |
Recreate a Document object inside the container |
|
JSON |
Document |
File Splitting |
Convert splitting results into a JSON to return from a container |
|
List of Documents |
JSON structured as the latest response schema |
File Splitting |
Create new Documents based on splitting results |
None |
JSON |
New Documents |
Information Extraction |
Convert a Document object into a JSON request |
|
Document |
JSON structured as the latest request schema |
Information Extraction |
Recreate a Document object inside the container |
|
JSON |
Document |
Information Extraction |
Convert info about extracted Annotations into a JSON to return from a container |
|
Annotation and Annotation Set data |
JSON structured as the latest response schema |
Information Extraction |
Reconstruct a Document and add new Annotations into it |
|
JSON |
Document |
The communication between Konfuzio Server (or anywhere else where the AI is served) and a containerized AI can be described as the following scheme:
If you want to containerize a custom AI, refer to the documentation on how to create and save a custom Extraction AI, a custom File Splitting AI, or a custom Categorization AI, respectively.
To learn more about the Bento containerization and how to configure your instance of Konfuzio to support them, refer to Dockerized AIs.
Coordinates System
The size of a page of a Document can be obtained in the Document object. The format is [width, height].
Original size of the Document is the size of the uploaded Document (which can be a PDF file or an image). The bounding boxes of the Annotations are based on this size.
E.g.: [1552, 1932]
Current size can be accessed via calling height and width from the Page object. They show the dimensions of the
image representation of a Document Page. These representations are used for computer vision tasks and the SmartView.
E.g.: [372.48, 463.68]
from konfuzio_sdk.data import Project

my_project = Project(id_=YOUR_PROJECT_ID)
# first Document uploaded
document = my_project.documents[0]
# index of the Page to test
page_index = 0

width = document.pages()[page_index].width
height = document.pages()[page_index].height
The coordinates system used has its start in the bottom left corner of the page.

To visualize the character bounding boxes of a document and overlapping them in the image opened with the python library PIL, for example, we can resize the image to the size in which they are based (original_size). The following code can be used for this:
from PIL import ImageDraw

from konfuzio_sdk.data import Project

my_project = Project(id_=YOUR_PROJECT_ID)
# first Document uploaded
document = my_project.get_document_by_id(YOUR_DOCUMENT_ID)
document.update()
document.get_bbox()
# index of the Page to test
page_index = 0
width = document.pages()[page_index].width
height = document.pages()[page_index].height
page = document.pages()[page_index]
image = page.get_image(update=True)
factor_x = width / image.width
factor_y = height / image.height
image = image.convert('RGB')
image = image.resize((int(image.size[0] * factor_x), int(image.size[1] * factor_y)))
height = image.size[1]
image_characters_bbox = [char_bbox for _, char_bbox in page.get_bbox().items()]

draw = ImageDraw.Draw(image)
for bbox in image_characters_bbox:
    image_bbox = (
        int(bbox['x0']),
        int((height - bbox['y1'])),
        int(bbox['x1']),
        int((height - bbox['y0'])),
    )
    draw.rectangle(image_bbox, outline='green', width=1)

image

# Note: cv2 has the origin of the y coordinates in the upper left corner. Therefore, for visualization, the
# height of the image is subtracted to the y coordinates.
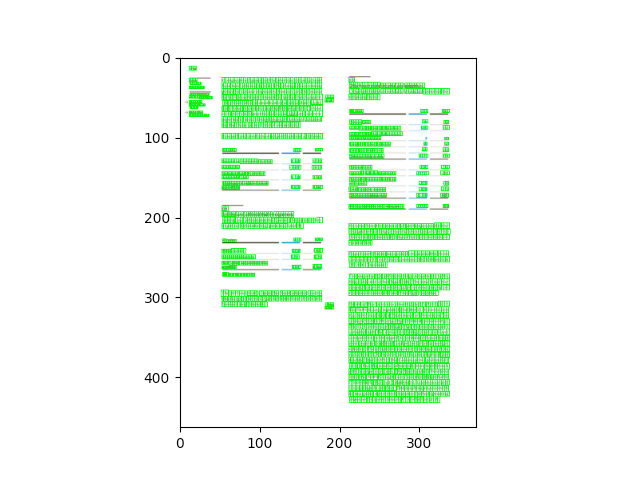
The coordinates obtained from the segmentation endpoint of the API are based on the image array shape. To visualize the segmentation bounding boxes of a page on an image opened with the python library PIL, for example, we can overlap them directly.
from PIL import ImageDraw

from konfuzio_sdk.api import get_results_from_segmentation
from konfuzio_sdk.data import Project

my_project = Project(id_=YOUR_PROJECT_ID)
# first Document uploaded
document = my_project.get_document_by_id(YOUR_DOCUMENT_ID)
# index of the Page to test
page_index = 0
page = document.pages()[page_index]
image = page.get_image(update=True)
image = image.convert('RGB')
draw = ImageDraw.Draw(image)
image_segmentation_bboxes = get_results_from_segmentation(document.id_, my_project.id_)

for bbox in image_segmentation_bboxes[page_index]:
    image_bbox = (
        int(bbox['x0']),
        int(bbox['y0']),
        int(bbox['x1']),
        int(bbox['y1']),
    )
    draw.rectangle(image_bbox, outline='red', width=1)

image

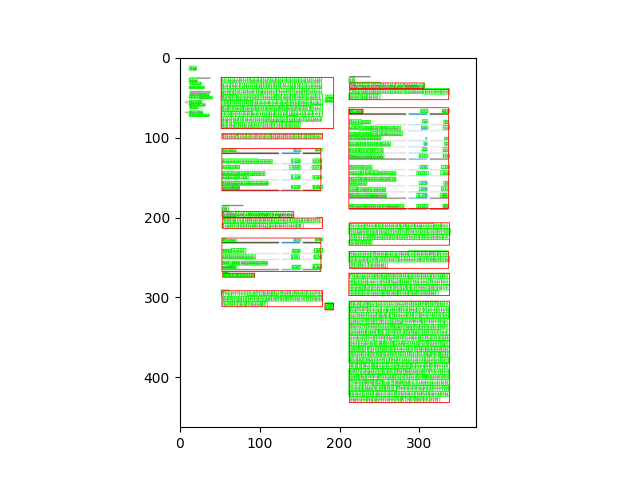
To visualize both at the same time we can convert the coordinates from the segmentation result to be based on the image size used for the characters’ bbox.
from PIL import ImageDraw

from konfuzio_sdk.api import get_results_from_segmentation
from konfuzio_sdk.data import Project

my_project = Project(id_=YOUR_PROJECT_ID)
# first Document uploaded
document = my_project.get_document_by_id(YOUR_DOCUMENT_ID)
# index of the Page to test
page_index = 0

width = document.pages()[page_index].width
height = document.pages()[page_index].height

page = document.pages()[page_index]
image = page.get_image(update=True)

factor_x = width / image.width
factor_y = height / image.height

image = image.convert('RGB')

image = image.resize((int(image.size[0] * factor_x), int(image.size[1] * factor_y)))
height = image.size[1]

image_characters_bbox = [char_bbox for _, char_bbox in page.get_bbox().items()]

draw = ImageDraw.Draw(image)

for bbox in image_characters_bbox:
    image_bbox = (
        int(bbox['x0']),
        int((height - bbox['y1'])),
        int(bbox['x1']),
        int((height - bbox['y0'])),
    )
    draw.rectangle(image_bbox, outline='green', width=1)

image_segmentation_bboxes = get_results_from_segmentation(document.id_, my_project.id_)

for bbox in image_segmentation_bboxes[page_index]:
    image_bbox = (
        int(bbox['x0'] * factor_x),
        int(bbox['y0'] * factor_y),
        int(bbox['x1'] * factor_x),
        int(bbox['y1'] * factor_y),
    )
    draw.rectangle(image_bbox, outline='red', width=1)

image

# Note: cv2 has the origin of the y coordinates in the upper left corner. Therefore, for visualization, the
# height of the image is subtracted to the y coordinates.
Our extraction AI runs a merging logic at two steps in the extraction process. The first is a horizontal merging of Spans right after the Label classifier. This can be particularly useful when using the Whitespace tokenizer as it can find Spans containing spaces. The second merging logic is a vertical merging of Spans into a single multiline Annotation. Checkout the architecture diagram for more detail.
Horizontal Merge
When using an Extraction AI, we merge adjacent horizontal Spans right after the Label classifier. The confidence of the resulting new Span if taken to be the mean confidence of the original Spans being merged.
A horizontal merging is valid only if:
All Spans have the same predicted Label
Confidence of predicted Label is above the Label threshold
All Spans are on the same line
Spans are not overlapping
No extraneous characters in between Spans
A maximum of 5 spaces in between Spans
The Label type is not one of the following: ‘Number’, ‘Positive Number’, ‘Percentage’, ‘Date’ OR the resulting merging create a Span normalizable to the same type
Input |
Able to merge? |
Reason |
Result |
|---|---|---|---|
Text Annotation |
yes |
/ |
Text Annotation |
Text Annotation |
no |
Text Annotation |
|
Text . Annotation |
no |
Text . Annotation |
|
Annotation 7 |
no |
Annotation 7 |
|
34 98 |
no |
|
34 98 |
34 98 |
yes |
/ |
34 98 |
November 2022 |
yes |
/ |
November 2022 |
Novamber 2022 |
no |
|
Novamber 2022 |
34 98% |
yes |
/ |
34 98% |
34 98% |
no |
34 98% |
Label Type: Text
Label Type: Number
Label Type: Date
Label Type: Percentage
Label Type: NO LABEL/Below Label threshold
Vertical Merge
When using an Extraction AI, we join adjacent vertical Spans into a single Annotation after the LabelSet classifier.
A vertical merging is valid only if:
They are on the same Page
They are predicted to have the same Label
Multiline annotations with this Label exist in the training set
Consecutive vertical Spans either overlap in the x-axis, OR the preceding Span is at the end of the line, and following Span is at the beginning of the next
Confidence of predicted Label is above the Label threshold
Spans are on consecutive lines
Merged lower Span belongs to an Annotation in the same AnnotationSet, OR to an AnnotationSet with only a single Annotation
Input |
Able to merge? |
Reason |
|---|---|---|
Text |
yes |
/ |
Annotation |
no |
|
Text more text |
no |
|
Some random text Text |
yes |
/ |
Some random text Text . |
no |
|
Text more text |
yes |
/ |
Text |
no |
|
Annotation Nb. |
yes |
* |
Annotation 41 |
no |
|
* The bottom Annotation is alone in its AnnotationSet and therefore can be merged.
** The Annotations on each line have been grouped into their own AnnotationSets and are not merged.
Label 1
Label 2
NO LABEL/Below Label threshold
Horizontal and Vertical Merge with the Paragraph and Sentence Tokenizers
When using the Paragraph or Sentence Tokenizer together with our Extraction AI model, we do not use the rule based vertical and horizontal merge logic above, and instead use the sentence/paragraph segmentation provided by the Tokenizer.
The logic is as follows:
And here’s an illustrated example of the merge logic in action: